A product manager’s responsibility is to improve an existing product in line with current market trends by offering new features and better user experience.
With a similar objective we started working on improvement of the existing atag.pk. Initially, I planned to release a couple of minor update releases to set the stage for a major upgrade release. But after conducting a comprehensive market research, I realized the potential of the tool and decided to go for a major release instead.
Current Product Scope
In its current state, the product sole purpose is to serve other sister applications, providing an interface for generating short links to public resources of each application.
It also provide a limited service to guest users of generating short links with validity of 30 days.
New Release Improvements
This major release introduced a complete shift from the current architecture. Starting-off, the product has been untethered from the current application ecosystem. It is now an autonomous service provider for all sorts of clients.
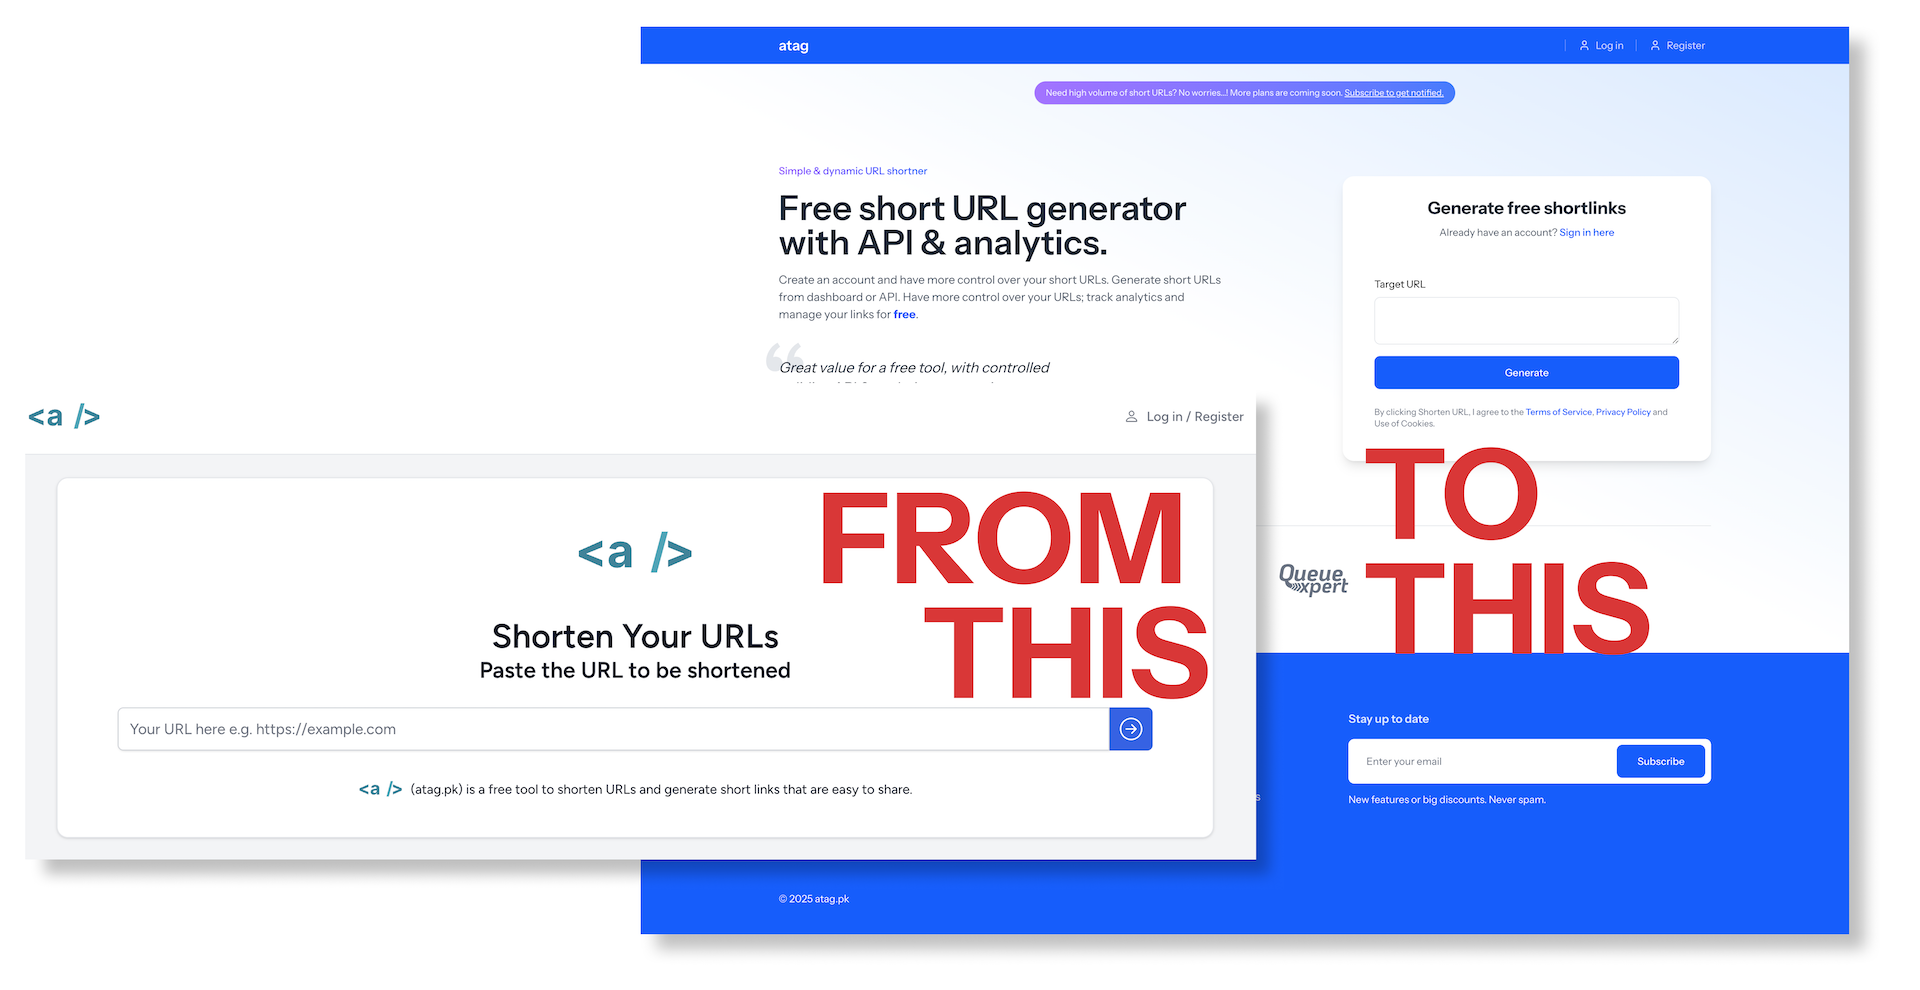
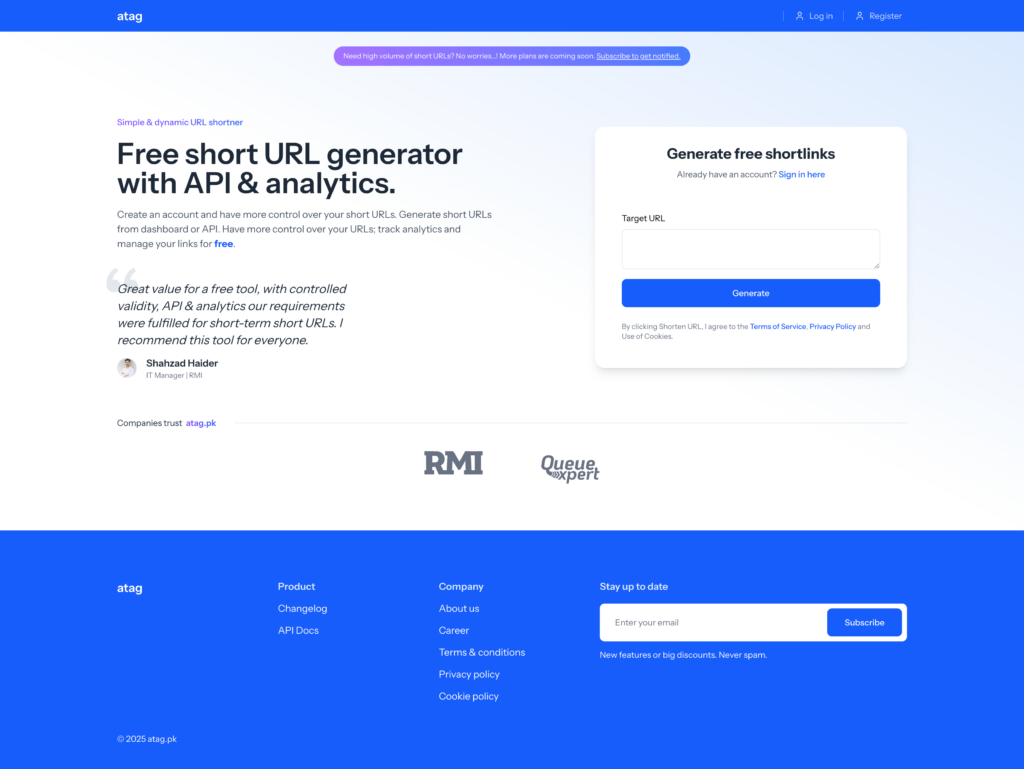
New design and rebranding for better image of the product.
Main focus has been to keep the product developer centric providing flexibility in interaction through API.
Analytics related to each link owned by a user is collected despite the plan subscribed.
Each joining user is allocated 100 free links with complete access to analytics and API. For users with a requirement of higher volume of short links, there are paid plans, designed to provide great value at a fraction of the cost. Paid plans have been scheduled to release periodically as we stress test the product.
Be sure to subscribe to our news letter to get notified on any updates.
Improved user experience with an intuitive design that keeps you focus on the task at hand.
Finally, changed the logo to match branding, here is the new look
All-in-all, this upgrade has set the product to be an autonomous service with better user interface and experience.
Cloud computing provides flexibility, reliability, and scalability to its consumers. Applications that run on Cloud are now more resource hungry than ever, and the need is constantly growing. The number of Cloud applications with diverse nature is growing, expecting greater performance in low cost. Fulfilling the quality of service (QoS) demands of such diverse applications is a challenging task and requires efficient network architectures, robust scheduling schemes, powerful and adaptable routing algorithms, reliable resource management, effective data exchange policies, and QoS improvement policies. Research community endeavors to provide solutions to various challenges faced by Cloud computing. These solutions must be tested thoroughly before their implementation in a real Cloud. Simulation seems a viable choice for testing a solution in different scenarios. There are a number of simulators available, focusing on certain aspects of Cloud while neglecting others. Their generalized implementation of the Cloud ignores various critical factors, such as networking characteristics, consequently affecting the tests and results of a solution. To tackle these issues, simplify simulation process, and provide the detailed implementation of the Cloud, we present Nutshell: a novel Cloud simulator that makes it easy to model, simulate, and experiment new Cloud solutions. Salient features offered by Nutshell include 1) provision of a platform for modeling and simulating Cloud infrastructure, 2) built-in essential components and helpers to create new architectures, 3) pre-built data center architectures, 4) plug-in-based architecture, 5) communication protocols, 6) pre-built virtual machine scheduler, 7) addressing schemes, 8) user applications, 9) virtual machines, 10) Job splitting, and 11) simulation data collection and exporting.
With the advancement in imaging technologies for scanning and printing, production of counterfeit banknotes has become cheaper, easier, and more common. The proliferation of counterfeit banknotes causes loss to banks, traders, and individuals involved in financial transactions. Hence, it is inevitably needed that efficient and reliable techniques for detection of counterfeit banknotes should be developed. With the availability of powerful smartphones, it has become possible to perform complex computations and image processing related tasks on these phones. In addition to this, smartphone users have increased greatly and numbers continue to increase. This is a great motivating factor for researchers and developers to propose innovative mobile-based solutions. In this study, a novel technique for verification of Pakistani banknotes is developed, targeting smartphones with android platform. The proposed technique is based on statistical features, and surface roughness of a banknote, representing different properties of the banknote, such as paper material, printing ink, paper quality, and surface roughness. The selection of these features is motivated by the X-ray Diffraction (XRD) and Scanning Electron Microscopy (SEM) analysis of genuine and counterfeit banknotes. In this regard, two important areas of the banknote, i.e., serial number and flag portions were considered since these portions showed the maximum difference between genuine and counterfeit banknote. The analysis confirmed that genuine and counterfeit banknotes are very different in terms of the printing process, the ingredients used in preparation of banknotes, and the quality of the paper. After extracting the discriminative set of features, support vector machine is used for classification. The experimental results confirm the high accuracy of the proposed technique.
Cloud computing has experienced enormous popularity and adoption in many areas, such as research, medical, web, and e-commerce. Providers, like Amazon, Google, Microsoft, and Yahoo have deployed their cloud services for use. Cloud computing pay-as-you-go model, on demand scaling, and low maintenance cost has attracted many users. The widespread adoption of cloud paradigm upshots various challenges. The legacy data center and cloud architectures are unable to handle the escalating user demands. Therefore, new data center network architectures, policies, protocols and topologies are required. However, new solutions must be tested thoroughly, before deployment within a real production environment. As the experimentation and testing is infeasible in the production environment and real cloud setup, therefore, there is an indispensable need for simulation tools that provide ways to model and test applications, and estimate cost, performance, and energy consumption of services and application within cloud environment. Simulation tools providing cloud simulation environments currently are limited in terms of features and realistic cloud setups, focus on a particular problem domain, and require tool-specific modeling, which can be frustrating and time consuming. This paper aims to provide a detailed comparison of various cloud simulators, discuss various offered features, and highlight their strengths and limitations. Moreover, we also demonstrate our work on a new cloud simulator “Nutshell”, which offers realistic cloud environments and protocols. The Nutshell is designed to diminish flaws and limitations of available cloud simulators, by offering: (a) multiple datacenter network architectures, like three-tier, fat-tree, and dcell, (b) fine grained network details, (c) realistic cloud traffic patterns, (d) congestion control strategies and analysis, (e) energy consumption, (f) cost estimation, and (g) data center monitoring and analysis. Flexibility to stretch the architectures to simulate smart city IT infrastructure.
It started off as a normal morning, in my todo list was an entry for “tech stack research for the new product”. When I started this task, I decided to spend only one hour on this and compile my report or so I thought!
While researching I like to do a test deployment of the stack to see whether I can deploy it or not. The consensus is, if I can deploy it easily the team can do it more quickly.
The tech stack that I choose will be deployed with the following setup:
Backend API to be developed with a framework
Frontend Web & mobile apps will consume the API.
Frontend Web App will not be deployed under the same domain.
After some searching on the web I shortlisted the following technologies:
Laravel: A PHP framework used for building web applications with an elegant syntax, MVC architecture, and built-in features like authentication, routing, and Eloquent ORM.
Django: A high-level Python web framework that emphasizes rapid development and security, following the “batteries-included” philosophy with built-in authentication, ORM, and admin panel.
ExpressJS: A lightweight and flexible Node.js web framework for building APIs and web applications. It simplifies server-side development with minimal setup and middleware support.
VueJS: A progressive JavaScript framework used for building user interfaces and single-page applications (SPAs). It’s known for its reactivity, component-based architecture, and easy learning curve.
Nginx: A high-performance web server, reverse proxy, and load balancer. It’s used to serve static content, improve scalability, and handle high concurrent connections efficiently.
MySQL: A relational database management system (RDBMS) that uses structured tables, SQL queries, and is widely used in applications requiring ACID compliance and structured data storage.
MongoDB: A NoSQL database that stores data in flexible, JSON-like documents, making it well-suited for applications needing scalability, high performance, and unstructured data management.
For deployment a few of my test criteria were:
How easily can I deploy the environment via Docker.
Container size
Database performance
Framework performance
Available packages for framework
Framework compatibility with the database
Authentication & Authorization complexity.
The combination of Laravel with MongoDB and the use of Sanctum for authentication and authorization took my whole day. So I decided to write about it with the hopes of helping others and for someone to suggest a better approach.
Assumption: You are running a php-fpmwith composer, nginx, and mogodb containers.
Installing Laravel
To install Laravel we need to connect to the php-fpm container. After switching the current working directory to /var/www. Run the command below. If you would like other method for installing the Laravel framework, checkout their documentation.
Now that Laravel is installed. We need to install Sanctum – a Laravel package that provides authentication and authorization for Single Page Applications (SPA), mobile applications, and simple, token based APIs.
php artisan install:api
This command will install Sanctum and publish other service provider components.
In order to use MongoDB with Laravel we need MongoDB-PHP extension and relevant package.
composer require mongodb/laravel-mongodb
Once the package is installed, it is time to further configure Laravel.
Configuration
The very first step is to open the class App\Models\User file and replace the Illuminate\Foundation\Auth\User class with MongoDB\Laravel\Auth\User and use HasApiToken trait if it is not already there.
use MongoDB\Laravel\Auth\User as Authenticatable;
use Laravel\Sanctum\HasApiTokens;

class User extends Authenticatable
{
    use HasApiTokens, HasFactory, Notifiable,
...
Next we need to customize the PersonalAccessToken class of Sanctum to use MongoDB DocumentModel trait and identify the primary key. Create a file in the Models folder and add the following content.
<?php

namespace App\Models;

use Laravel\Sanctum\PersonalAccessToken as SanctumPersonalAccessToken;
use MongoDB\Laravel\Eloquent\DocumentModel;

class PersonalAccessToken extends SanctumPersonalAccessToken
{
    use DocumentModel;
    protected $primaryKey = '_id';
}
After saving the file open the file App\Providers\AppServiceProvider and add the following line to the boot method.
use Laravel\Sanctum\Sanctum;
use App\Models\PersonalAccessToken;


Sanctum::usePersonalAccessTokenModel(PersonalAccessToken::class);
Next we create a controller to issue an access token. Create a LoginController and add the following content
<?php

namespace App\Http\Controllers;

use App\Http\Controllers\Controller;
use App\Models\User;
use Illuminate\Http\Request;
use Illuminate\Support\Facades\Auth;
use Illuminate\Support\Facades\Hash;
use Illuminate\Validation\ValidationException;

class LoginController extends Controller
{

    public function __invoke(Request $request)
    {
        $request->validate([
            'email' => 'required|email',
            'password' => 'required',
            'device_name' => 'required',
        ]);

        $user = User::where('email', $request->email)->first();

        if (! $user || ! Hash::check($request->password, $user->password)) {
            throw ValidationException::withMessages([
                'email' => ['The provided credentials are incorrect.'],
            ]);
        }

        return response()->json([
            'user' => $user->details,
            'access_token' => $user->createToken($request->device_name)->plainTextToken
        ]);
    }

}
Now we create two routes inside routes/api.php file one for login and another protected route to test token authorization.
Route::post('auth/token', LoginController::class);

Route::middleware('auth:sanctum')->get('/user', function (Request $request) {
    return $request->user();
});
To test the setup open tinker and create a User. After that open your favorite API testing app e.g. postman or thunder client for VS code and login as shown:
Copy the value of access_token and use it for the next request Authorization header Bearer token as shown:
Surprise!! Unauthorized… If it worked for you congratulations! You can continue your API development.
But if it didn’t like in my case, continue this article. This particular issue took me the whole day to solve and the solution was a simple one.
I used my own custom middleware.
Create a middleware using the command below:
php artisan make:middleware TokenAuthMiddleware
Next open the middleware file and add the code below:
<?php

namespace App\Http\Middleware;

use App\Models\PersonalAccessToken;
use Closure;
use Illuminate\Auth\Access\AuthorizationException;
use Illuminate\Http\Request;
use Illuminate\Support\Facades\Auth;
use Symfony\Component\HttpFoundation\Response;

class TokenAuthMiddleware
{
    /**
     * Handle an incoming request.
     *
     * @param  \Closure(\Illuminate\Http\Request): (\Symfony\Component\HttpFoundation\Response)  $next
     */
    public function handle(Request $request, Closure $next): Response
    {
        $bearer = $request->bearerToken();

        if (! $bearer ) throw new AuthorizationException("Unauthorized");

        [$id, $tval] = explode('|', $bearer, 2);

        $token = PersonalAccessToken::where('token', hash('sha256', $tval))->first();
        $expiration = config('sanctum.expiration');

        if (
            $token &&
            ( ! $token->expires_at || ! $token->expires_at->isPast()) &&
            (! $expiration || $token->created_at->gt(now()->subMinutes($expiration)))
        ) // check if the token is valid as well.
        {
            $token->forceFill(['last_used_at' => now()])->save();
            $user = $token->tokenable;
            Auth::login($user); // <---- this line resolved the issue.
            return $next($request);
        }

        throw new AuthorizationException("Unauthorized");


    }
}
Save the file and open the routes/api.php file again and change the middleware ‘auth:sanctum’ to TokenAuthMiddleware
Route::middleware(TokenAuthMiddleware::class)->get('/user', function (Request $request) {
    return $request->user();
});
Now if you try again it will work. Feel free to post your solution in the comments section.
In the previous article we modified the infrastructure to accommodate high volume of traffic. Such an infrastructure is susceptible to a single point of failure.
In this article we will further work on the infrastructure and introduce redundancy to counter the single point of failure vulnerability.
Before we proceed with the infrastructure upgrade, an important concept to clear is the use of floating IPs. Floating IPs are a kind of virtual IP address that can be dynamically routed to any network interface in the same network. Multiple hosts can own the same Floating IP address, but it can only be active on one server at any given time.
Floating IPs can be used to:
Keep the same IP address on a server, despite migration
Create a redundant firewall with stateful connection sync over our Private Network
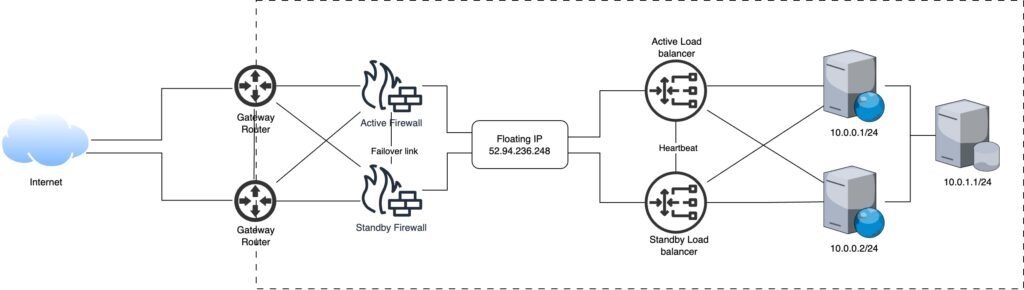
Upgrading The Web Application Infrastructure
In order to overcome the single point of failure vulnerability we introduce redundancy.
Load Balancers: While making the load balancers redundant, only one can stay in active state and serve incoming traffic. The load balancers share a direct link between them, used for heartbeat signal, which allows the other load balancer to change its state to active upon the failure of the currently active load balancer. Both load balancers can respond to similar traffic as they share a floating IP when active.
Firewalls: Similar to load balancers, firewalls can also have a single active firewall. Using the failover link between the firewalls, they share their status and the standby firewall takes over when the currently active firewall goes down.
Gateways: Both gateways can operate in active states, forwarding traffic to the active firewall and destination load balancer.
Step 3: Transport Control Protocol (TCP)
The SYNC message from client reaches the gateway. The gateway forwards the packet to the active firewall, after evaluation the packet is forwarded to the active load balancer, it decides which node this new packet should go to based on the algorithm discussed in previous article. The load balancer decides that the message should go to the first node (10.0.0.1/24). The server responds and subsequent packets follow the same route i.e. communicates with the first node.
In the previous article we have discussed a very basic architecture to host a web application and how the web request cycle is carried out. In this article we will modify the architecture to set a starting point for hosting an application when a high volume of traffic is expected.
A single server has limited resources and when bombarded with millions of requests, it is bound to choke. In order to handle such a high volume traffic, resources must be added to the existing setup. This process is called scaling.
When it comes to hardware, there are two types of scaling.
Vertical Scaling: When resources are added to the existing hardware e.g. RAM, CPU or hard disk.
Horizontal Scaling: When nodes are added to the existing pool of nodes.
In this article we will focus on horizontal scaling and add nodes and relevant components to make the architecture work.
Upgrading The Web Application Infrastructure
We started with an infrastructure as shown:
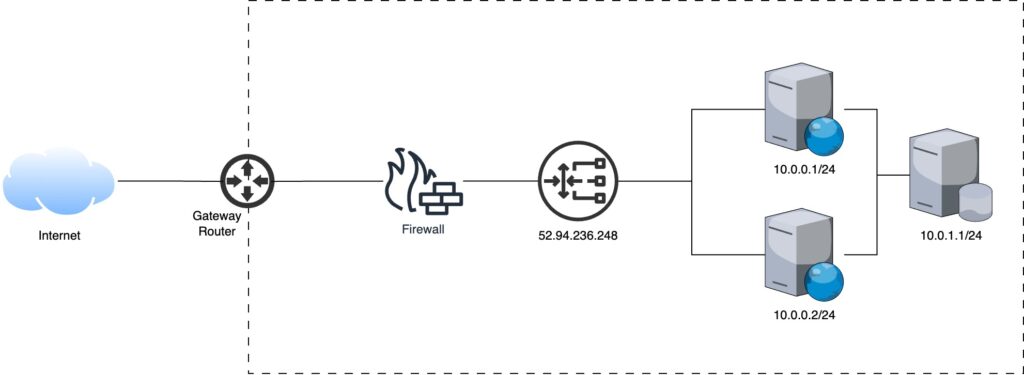
Our goal is to scale the environment horizontally by adding nodes for the application to run and a mechanism to control the traffic to each node. We call that load balancing and can be achieved with a load balancer either a hardware or software.
Load balanced application infrastructure
Load balancer acts as a traffic proxy and distributes network or application traffic across endpoints on a number of servers running the same code base of the application. The load balancer distributes traffic based on algorithms such as:
Round robin
Threshold
Random with two choices
Least connections
Least time
URL hash
Source IP hash
Consistent hashing
Web Request Cycle
With the upgrade in the infrastructure the web request cycle changes slightly. The load balancer receives all the web requests and distributes them amongst the pool of resources. Step 3 of the previous article introduces this change.
Step 3: Transport Control Protocol (TCP)
The SYNC message from client reaches the load balancer, it decides which node this new packet should go to based on the algorithm discussed. The load balancer decides that the message should go to the first node (10.0.0.1/24). The server responds and subsequent packets follow the same route i.e. communicates with the first node.
What happens when we visit a website in a web browser? To the user a web page opens up in a few seconds depending on the size of web page content, but behind the scenes different components of the web or internet work together to load that particular web page in the browser.
In this series we will explore how a web request is navigated across the internet and fulfilled by the web application hosted in different infrastructures. For simplicity we will consider a monolithic application architecture.
In simple terms the application architecture refers to the framework and principles in which the application components collaborate to perform the intended function.
Types of application architectures:
Monolithic
Client-Server
Microservices
Server less
Progress Web App
Application infrastructure is the underlying hardware and software components that enables the system to function. This include load balancers, firewalls, servers, and VMs etc.
Web Application Monolithic Architecture
Monolithic application architecture defines a web application as a single unit, i.e. the user interface, business logic and data access are tightly coupled in a single code base. e.g. WordPress
Web Application Infrastructure
In order for a web application to serve its users, it must be deployed on a server accessible via the internet. The very basic setup required for such applications include:
Server or a VM with web server (Apache or Nginx) installed
Public IP (IPv4 for simplicity)
Router & Firewall
The infrastructure diagram is depicted below:
Bare Minimum Web Application Infrastructure
Web Request Cycle
When a user types in a URL (Uniform Resource Locator) in their web browsers the web browser loads that particular resource after a series of communication with the components on the internet. The whole process is carried out in steps:
The URL consists of a protocol (https://) and a domain name (amazon.com) also called a fully qualified domain name (FQDN). Often, URLs will have www in them which is a sub-domain and references the deprecated phrase “World Wide Web” popular in 1990s.
Step 2: Name Resolution Through Domain Name Server (DNS)
Machines are identified by their IPs in a network. IP (Internet Protocol) is an address either v4 (32-bit numeric) or v6 (128 bit hexadecimal) that provide identification to any network device capable of communication on Layer-3 of the OSI or TCP/IP stack. Thus, to access a web application, we require the IP address of the server it is hosted on. In the case of https://amazon.com the IP address can be acquired by using a tool called ping, which is 52.94.236.248 as shown:
Ping results for amazon.com
Accessing a web application or website through IP makes memorization difficult. To overcome this problem domain names are used to identify Internet resources, with a text-based label that is easier to memorize than the numerical or hexadecimal addresses used in the Internet protocols.
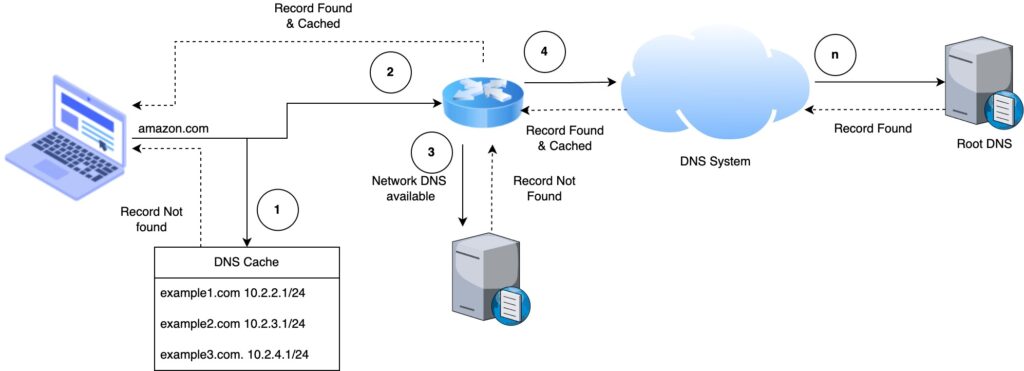
Domain Name Server (DNS) is used to map the text-based label to the IP. The root / authoritative DNS contains all the registered domain names. The first-level set of domain names are the top-level domains (TLDs), including the generic top-level domains (gTLDs), such as the prominent domains com, info, net, edu, and org, and the country code top-level domains (ccTLDs).
DNS entries are cached at different levels in the network such as ISPs, organization DNS, routers and OS for faster resolution. At first, the DNS cache maintained by the browser is checked, if an entry does not exist, next the gateway router or closest DNS, if fails, next the ISP DNS so on and so forth until the root DNS.
DNS System
In order to make the resolution direct we can enter public DNS available in OS network configuration. Public DNS provided by Google are 8.8.8.8 and 8.8.4.4
Once the domain name is resolved the browser receives an IP for the resource.
Step 3: Transport Control Protocol (TCP)
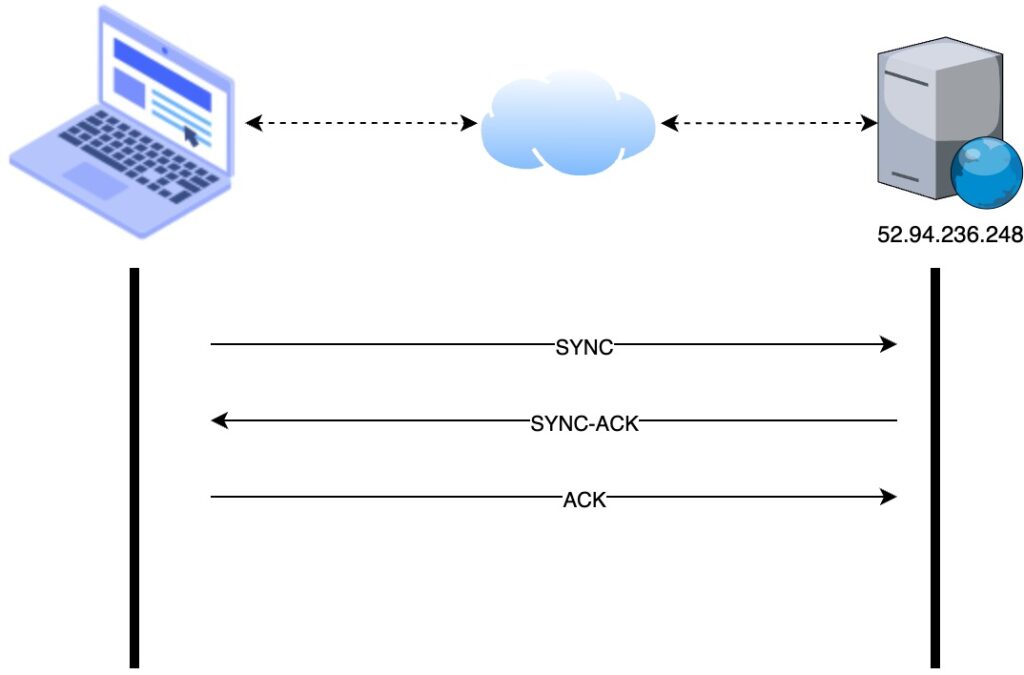
The OS initiate a TCP connection with the server. The connection is established using a three-way handshake.
TCP Three-way Handshake
The SYNC message is sent from the user device to the server
The server responds with an acknowledgement (SYNC-ACK) message that the message has been received
The user device responds with an acknowledgement (ACK) message informing the server that it had received the acknowledgement sent by it.
At this stage the connection has been established and data can transmit between the two parties.
Step 4: Hypertext Transfer Protocol (HTTP)
Web application data is communicated using the application layer protocol referred to as HTTP. The browser sends a GET request to the server requesting the resource from the web server. In that request the browser adds its identifier in the packet header called user-agent. The value can be used to present a specialized web page for that device. e.g. a web browser on mobile phone can have a different layout than a desktop one.
Step 5: Web server response
The web server (Apache or Nginx) accepts the request, a back-end programming language or framework (PHP, Ruby, Python) decides what content to send, generates or loads that content and sends the response in HTML (Hypertext Markup Language) as shown:
<!DOCTYPE html>
<html>
    <head>
        <!-- head definitions go here -->
    </head>
    <body>
        <!-- the content goes here -->
    </body>
</html>
Step 6: Browser renders the content
The response content is only text and the browser responsibility is to render the text into a proper format. The browser reads the response line by line and start loading other resources i.e. static files such as media, scripts and styles.
Upon downloading static files the browser applies styling and runs the JavaScript linked to the page and the result looks as shown